Converting cell values from text to number or from number to text is a common task that many people encounter when working with Excel spreadsheets. There are various reasons why you may need to convert data in this way, including mathematical calculations, data analysis, and formatting issues. In this article, we will explore how to convert Excel cell values from text to number or from number to text using C# and VB.NET.
- Convert Excel Cell Values from Text to Number in C# and VB.NET
- Convert Excel Cell Values from Number to Text in C# and VB.NET
Installation
To convert Excel cell values, this article uses Spire.XLS for .NET library. You can install Spire.XLS for .NET via NuGet by selecting Tools > NuGet Package Manager > Package Manager Console, and then executing the following command:
PM> Install-Package Spire.XLS
Alternatively, you can also download the DLL files of Spire.XLS for .NET from its official website, extract the package and then add the DLL files under the Bin folder to your project as references.
Convert Excel Cell Values from Text to Number in C# and VB.NET
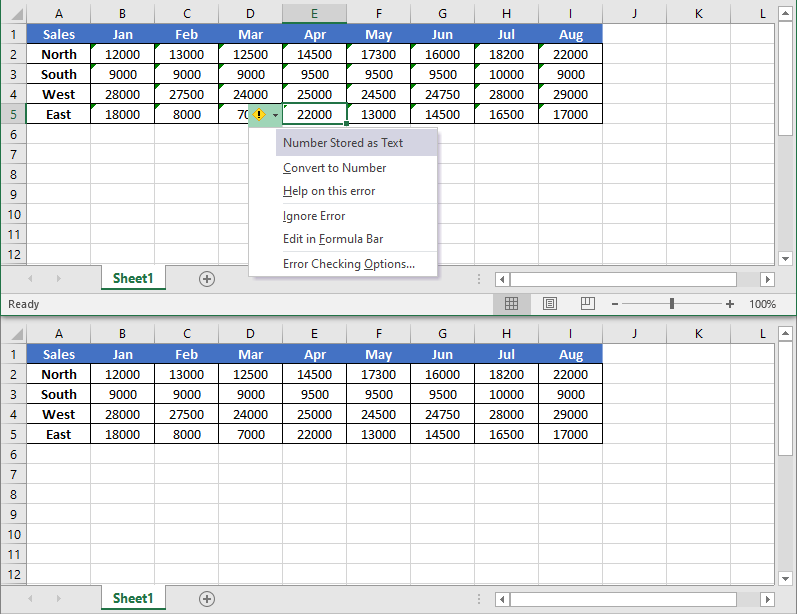
Excel might treat numerical values stored as text as text and not recognize them as numbers. Therefore, you may get wrong results when you perform calculations on those values. In such a case, you can convert the numerical values stored as text to number format.
In Spire.XLS, you can use the XlsRange.ConvertToNumber() method to implement this function. The following are the detailed steps:
- Initialize an instance of the Workbook class.
- Load an Excel file using the Workbook.LoadFromFile(string fileName) method.
- Get a specific worksheet of the file using the Workbook.Worksheets[int index] property.
- Get the cell range containing numerical values stored as text using the Worksheet.Range[string name] property.
- Call the XlsRange.ConvertToNumber() method to convert the values of the cell range to number format.
- Save the result file to a specific location using the Workbook.SaveToFile(string fileName, ExcelVersion version) method.
C#
using Spire.Xls;

namespace ConvertTextToNumber
{
    internal class Program
    {
        static void Main(string[] args)
        {
            //Initialize an instance of the Workbook class
            Workbook workbook = new Workbook();

            //Load an Excel file
            workbook.LoadFromFile(@"Sample1.xlsx");

            //Get the first worksheet of the file
            Worksheet worksheet = workbook.Worksheets[0];

            //Get the cell range containing numerical values stored as text
            CellRange range = worksheet.Range["B2:I5"];
            //Convert the values of the cell range to number format
            range.ConvertToNumber();

            //Save the result file to a specific location
            workbook.SaveToFile("ConvertTextToNumber.xlsx", ExcelVersion.Version2013);
            workbook.Dispose();
        }
    }
}
VB.NET
Imports Spire.Xls

Namespace ConvertTextToNumber
    Friend Class Program
        Private Shared Sub Main(ByVal args As String())
            'Initialize an instance of the Workbook class
            Dim workbook As Workbook = New Workbook()

            'Load an Excel file
            workbook.LoadFromFile("Sample1.xlsx")

            'Get the first worksheet of the file
            Dim worksheet As Worksheet = workbook.Worksheets(0)

            'Get the cell range containing numerical values stored as text
            Dim range As CellRange = worksheet.Range("B2:I5")
            'Convert the values of the cell range to number format
            range.ConvertToNumber()

            'Save the result file to a specific location
            workbook.SaveToFile("ConvertTextToNumber.xlsx", ExcelVersion.Version2013)
            workbook.Dispose()
        End Sub
    End Class
End Namespace
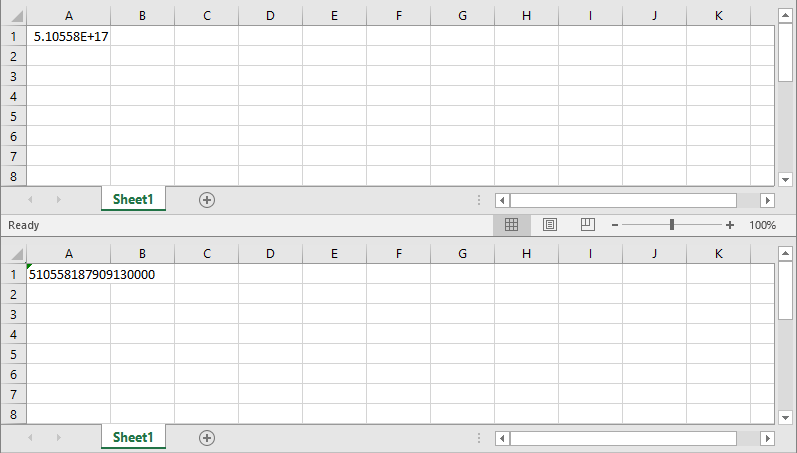
Convert Excel Cell Values from Number to Text in C# and VB.NET
Converting Excel cell values from number to text can be useful in situations where you need to display numerical data as text, such as when working with account numbers or other identification numbers that should not be subject to mathematical operations.
In Spire.XLS, you can format numerical values as string using the XlsRange.NumberFormat property. The following are the detailed steps:
- Initialize an instance of the Workbook class.
- Load an Excel file using the Workbook.LoadFromFile(string fileName) method.
- Get a specific worksheet of the file using the Workbook.Worksheets[int index] property.
- Get the cell range containing numerical values stored as text using the Worksheet.Range[string name] property.
- Format the values of the cell range as string using the XlsRange.NumberFormat property.
- Save the result file to a specific location using the Workbook.SaveToFile(string fileName, ExcelVersion version) method.
C#
using Spire.Xls;

namespace ConvertNumberToText
{
    internal class Program
    {
        static void Main(string[] args)
        {
            //Initialize an instance of the Workbook class
            Workbook workbook = new Workbook();

            //Load an Excel file
            workbook.LoadFromFile(@"Sample2.xlsx");

            //Get the first worksheet of the file
            Worksheet worksheet = workbook.Worksheets[0];

            //Get the cell range containing numerical values
            CellRange range = worksheet.Range["A1"];
            //Format the numerical values as string
            range.NumberFormat = "@";

            //Save the result file to a specific location
            workbook.SaveToFile("ConvertNumberToText.xlsx", ExcelVersion.Version2013);
            workbook.Dispose();
        }
    }
}
VB.NET
Imports Spire.Xls

Namespace ConvertNumberToText
    Friend Class Program
        Private Shared Sub Main(ByVal args As String())
            'Initialize an instance of the Workbook class
            Dim workbook As Workbook = New Workbook()

            'Load an Excel file
            workbook.LoadFromFile("Sample2.xlsx")

            'Get the first worksheet of the file
            Dim worksheet As Worksheet = workbook.Worksheets(0)

            'Get the cell range containing numerical values
            Dim range As CellRange = worksheet.Range("A1")
            'Format the numerical values as string
            range.NumberFormat = "@"

            'Save the result file to a specific location
            workbook.SaveToFile("ConvertNumberToText.xlsx", ExcelVersion.Version2013)
            workbook.Dispose()
        End Sub
    End Class
End Namespace